🍯 Sweet & Spicy Honey Pepper Chicken: A Crispy, Glazed Dream in Under 30 minutes!
1. Introduction
There’s something deeply satisfying about a dish that delivers crackling crunch on the outside and tenderness on the inside—wrapped in a glossy, sticky glaze that clings like golden silk. This honey pepper chicken is exactly that: a perfect balance of sweet heat, garlic zing, and a caramelized finish that’ll have you licking the plate clean. Inspired by Korean-inspired gochujang glazes and classic American honey-burger sensibilities, this recipe is a kitchen standout—whether you’re tossing it over rice, nesting it in a lettuce cup, or enjoying it straight from the pan with a fork (no judgment here!).
2. Why You’ll Love This Recipe
- Ready in under 25 minutes—faster than delivery, infinitely tastier.
- One-pan wonder (plus a small bowl for the glaze) = minimal cleanup.
- Boneless, skinless chicken thighs stay juicy; you can swap in breasts if you prefer leaner cuts (more on that in the tips!).
- Versatile flavor highway: Serve over rice, in bao buns, sobre nachos, or alongside roasted veggies.
- Meal-prep-friendly: Tastes even better the next day as leftovers heat up into a rich, glossy tái-cooked masterpiece.
3. Ingredient Notes
Quality makes all the difference here—and I learned that the hard way after a slightly bitter first attempt (turns out cheap soy sauce *does* matter!). Here’s my go-to checklist:
- Soy sauce: Go for a reputable name like Kikkoman or La choy. Lite tamari works for gluten-free needs; avoid “reduced-sodium” unless you’re willing to add a splash of fish sauce for depth.
- Honey: Raw, local honey has a richer floral note than run-of-the-mill supermarket globs. But don’t worry—run-of-the-mill works just fine in a pinch!
- Fresh garlic & ginger: Not optional. Bottled versions lack the volatile oils that ignite when hit with heat. Grate your ginger finely—or use a microplane—and mince your garlic just before adding (it burns fast!).
- Red pepper flakes or gochugaru: For authentic Korean heat, air fryer-friendly gochugaru is ideal (mild, fruity, smoky), but red pepper flakes bring a brighter, sharper kick.
- Black pepper: Use freshly cracked—pre-ground loses its punch fast.
4. Kitchen Tools You Need
You *can* make this with a basic frying pan—but using the right tools makes it faster, crispier, and far more consistent. Here’s what I reach for:
- Ninja Air Fryer Pro Crisp & Roast 4-in-1: For extra-crispy edges without steaming your chicken in its own juices. The crispy mode hits 400°F fast and circulates heat like a pro.
- CAROTE Premium 16pc Nonstick Cookware Set: This hard-anodized skillet has zero hot spots, so your glaze caramelize evenly—no burnt garlic panic.
- Deluxe 33-Piece Silicone Utensil Set: Heat-resistant, gentle on nonstick, and perfect for stirring that thick honey-garlic glaze without scratching.
- Microplane zester: For grating fresh ginger and garlic—don’t skip this. The difference in aroma is *huge*.
- Instant-read thermometer: Chicken thighs are safe at 165°F—but I aim for 160–162°F so residual heat finishes the job for ultra-jubsy meat. Fullstar Ultimate Veggie Prep Master includes one, but solo thermometers run less than $20.
5. How to Make Honey Pepper Chicken
Phase 1: Prep & Marinate (5 minutes)
Trim chicken thighs (if needed) and cut into 1-inch bite-sized pieces. In a medium bowl, whisk together: 3 tbsp soy sauce, 2 tbsp honey, 1 tbsp rice vinegar, 1 tbsp minced ginger, 3 minced garlic cloves, 1 tsp freshly cracked black pepper, ½ tsp red pepper flakes (adjust for heat). Add chicken, toss to coat, and let sit for 10 minutes (or up to 30 min fridge for deeper flavor). Pro tip: Don’t rush this step—even 5 minutes helps.
Phase 2: Sear & Caramelize (12–15 minutes)
Heat 1 tbsp neutral oil (like avocado or grapeseed) in a large skillet over medium-high heat. Add chicken in a single layer—don’t crowd! You may need 2 batches. Sear for 3–4 minutes per side until deeply golden. Transfer to a clean plate.
Phase 3: Glaze & Thicken (3 minutes)
Add the remaining marinade to the hot pan—what? YES, the raw one! The vinegar and soy will kill anything questionable, *but* bring it to a boil and simmer for 2 minutes to cook out raw garlic taste. Now stir in 1 tbsp cornstarch mixed with 1 tbsp cold water (slurry!), whisking fast. It’ll thicken in seconds. Return chicken to the pan and toss until every piece glistens with a glossy, syrupy coating.
Phase 4: Finish & Serve
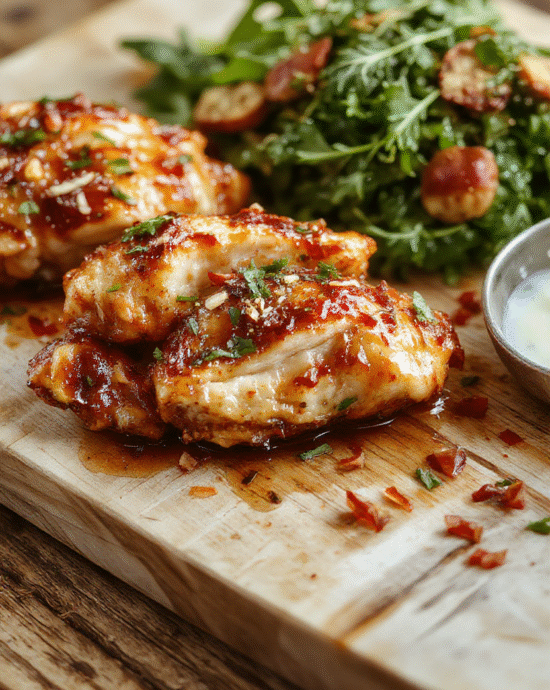
Top with sliced green onions, sesame seeds, and extra black pepper. Serve hot with steamed jasmine rice or my personal fave combo: over crispy baked potato slices for crunch layered with sweetness.
6. Expert Tips for Success
- Chicken choice: Thighs > breasts here—the fat keeps them juicy under high heat. If using breasts, cut thicker and finish cooking in the oven at 375°F for 12 minutes to avoid dryness.
- Don’t skip the cornstarch slurry: It stabilizes the glaze and prevents it from separating when meat juices re-enter the pan.
- Two-pan hack: Sear in the oven-safe skillet, then finish in a 400°F oven for 8–10 minutes for even cooking + extra browning.
- Low-and-slow glaze danger: If it bubbles too violently, reduce heat. Honey burns *fast*—you want a gentle simmer, not a scorching boil.
- Garnish like a pro: Toasted sesame seeds + reserved green onion tops = restaurant-level finish. A squeeze of lime cuts the richness beautifully.
7. Variations & Substitutions
- Gluten-free: Swap soy for tamari or coconut aminos (reduce honey to 1½ tbsp if using aminos—they’re saltier).
- Lower sugar: Replace up to half the honey with pure maple syrup or monk fruit blend (just test heat retention).
- Extra-crunchy: Toss cooked chicken in 2 tbsp crushed peanuts or toasted almonds at the end.
- Spicier version: Add 1 tsp gochugaru + ½ tsp sriracha to the glaze, or stir in a finely minced jalapeño with the garlic.
- Omni or plant-based: Works beautifully with extra-firm tofu (press 15 min first) or Beyond Chicken.Strips.
8. Storage & Reheating
Store in an airtight glass container for up to 4 days. Reheat in a skillet over medium-low with a splash of water or broth to revive the glaze. Avoid microwaving straight—it tends to dry out the edges. (If you *must* microwave, cover with a damp paper towel.)
Freezer tip: Freeze *without* the glaze. Thaw overnight, then re-glaze and sear. The sauce can separate if frozen full-assembled.
9. FAQ
Q: Can I use honey garlic chicken instead of honey pepper chicken?
A: Absolutely! This recipe is fundamentally a sweet and spicy honey garlic chicken with extra black pepper depth—swap names freely.
Q: Why is my glaze watery?
A: You probably skipped the cornstarch slurry—or added it when the pan wasn’t hot enough. The sauce should bubble vigorously for 1 full minute after adding to activate thickening.
Q: What do I serve with honey pepper chicken?
A: My go-tos? crispy katsu bowls, steamed bok choy, or this crispy baked potato slice side. For dessert, a warm slice of simple bread pudding makes a perfect sweet finish.
Q: Is this recipe kid-approved?
A: Yes—even picky eaters love the sweetness! Just reduce pepper flakes to ¼ tsp or omit entirely. Add more honey if needed.
10. Conclusion
This honey pepper chicken is the kind of dish that makes you pause mid-bite and whisper, “I made this?” It’s bold, balanced, and adaptable—perfect for weeknights, weekend batch-cooking, or impressing guests with minimal effort. Once you nail the glaze ratio and master the sear, you’ll be creating your own variations in no time. Now go grab that air fryer or skillet—and savor every sticky, savory, spicy bite.
Print
Sweet and Spicy Honey Pepper Chicken
A bold, sweet-and-spicy honey pepper chicken recipe with sticky glaze, seared to perfection and finished with fresh herbs.
- Total Time: 25 minutes
- Yield: 4 servings 1x
Ingredients
- 1.5 lbs boneless skinless chicken thighs, cut into bite-sized pieces
- 2 tbsp olive oil
- 3 cloves garlic, minced
- 1 tbsp fresh ginger, grated
- ¼ cup honey
- 2 tbsp soy sauce (or tamari for gluten-free)
- 1 tbsp apple cider vinegar
- 1 tsp crushed red pepper flakes
- ½ tsp black pepper, freshly cracked
- 1 tbsp cornstarch (optional, for thickening)
- Fresh cilantro and sliced jalapeños for garnish
Instructions
- Pat chicken dry and season lightly with salt.
- Heat olive oil in a large skillet over medium-high heat. Add chicken and sear 4–5 minutes per side until golden brown.
- Push chicken to side; add garlic and ginger to the pan. Stir 30 seconds until fragrant.
- Stir in honey, soy sauce, vinegar, red pepper flakes, and black pepper. Bring to a simmer.
- If using cornstarch, Mix with 1 tbsp cold water and stir into sauce. Simmer 2 minutes until glossy and thickened.
- Serve immediately, garnished with cilantro and jalapeños.
Notes
- For extra heat, add 1 tsp gochujang or sriracha with the sauce.
- Can use chicken breast, but thighs stay juicier.
- Pair with steamed rice, stir-fried veggies, or roasted sweet potatoes.
- Prep Time: 10 minutes
- Cook Time: 15 minutes
- Method: Stovetop
- Cuisine: Asian-inspired
- Diet: High Protein
Nutrition
- Serving Size: 1 serving (about 6 oz)
- Calories: 312 Kcal
- Sugar: 14g
- Sodium: 612mg
- Fat: 12g
- Saturated Fat: 3g
- Unsaturated Fat: 8g
- Trans Fat: 0g
- Carbohydrates: 24g
- Fiber: 1g
- Protein: 32g
- Cholesterol: 97mg